- Minecraft
- Minecraft Shared
- Game Servers
- Hytale
- FiveM
- Rust New
- ARK New
- VPS & Dedicated
- VPS Germany
- VPS MiamiNEW
- Dedicated USA
- Other products
- Discord Bots
- Domains New
- Status
- Blog
- About Us
- Contact Us
- Reviews
- Discord
Guía oficial del panel
Primeros pasos con tu servidor
De cero a jugar con tus amigos en unos minutos, sin tocar nada técnico. Cada paso con la pantalla real del panel delante.
PASO 01
Entra al panel sin contraseñas extra
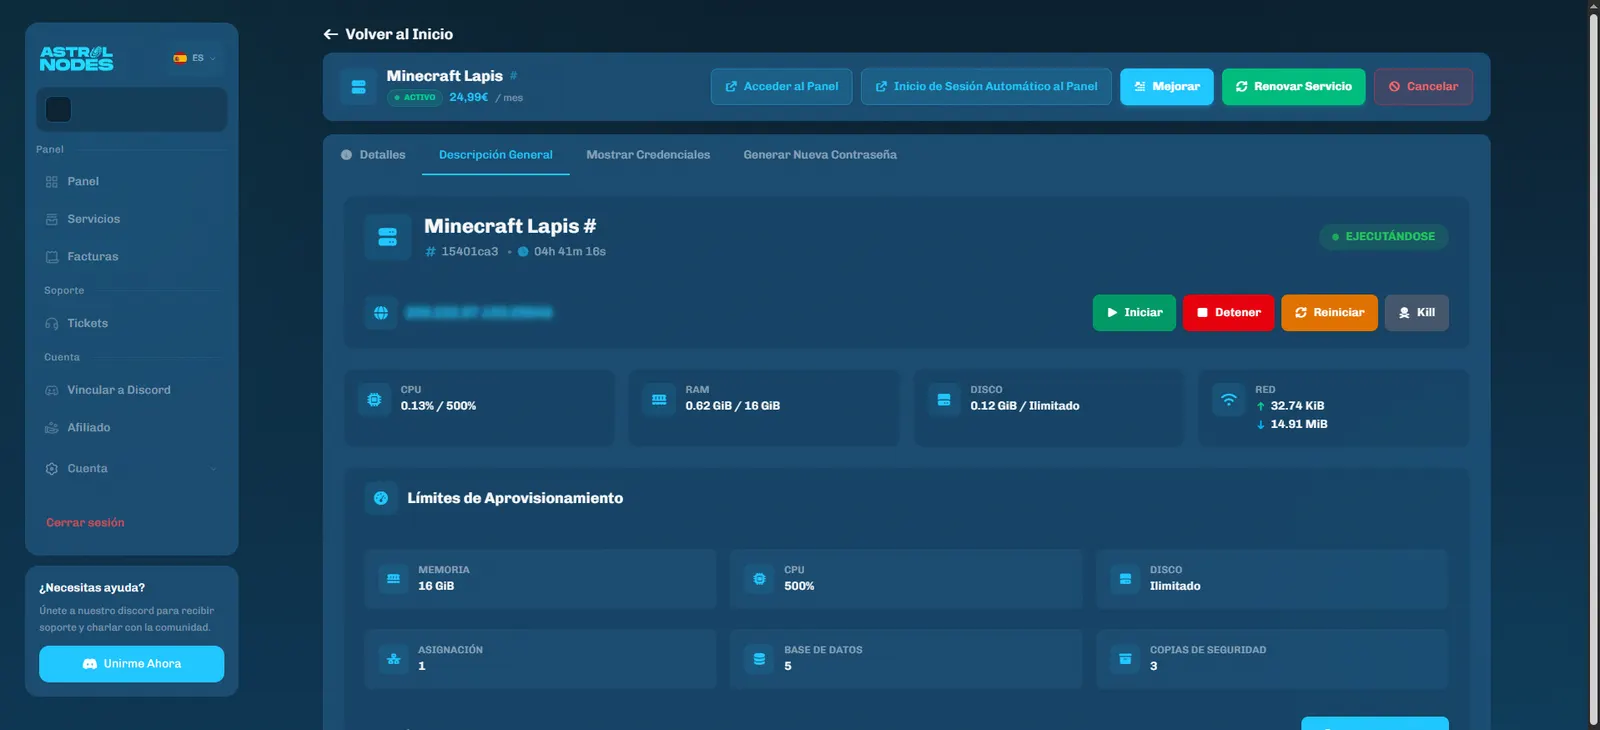
- Inicia sesión y entra directo a tus servicios: astrolnodes.net/services.
- Abre tu servidor y pulsa «Inicio de Sesión Automático al Panel».
- Entras directo a gamedash.astrolnodes.net, tu panel de control. No hace falta registrarse otra vez.
Todo lo demás pasa en el panel: arrancar, cambiar versión, instalar mods, backups… Guárdalo en favoritos.
PASO 02
Arranca tu servidor desde la consola
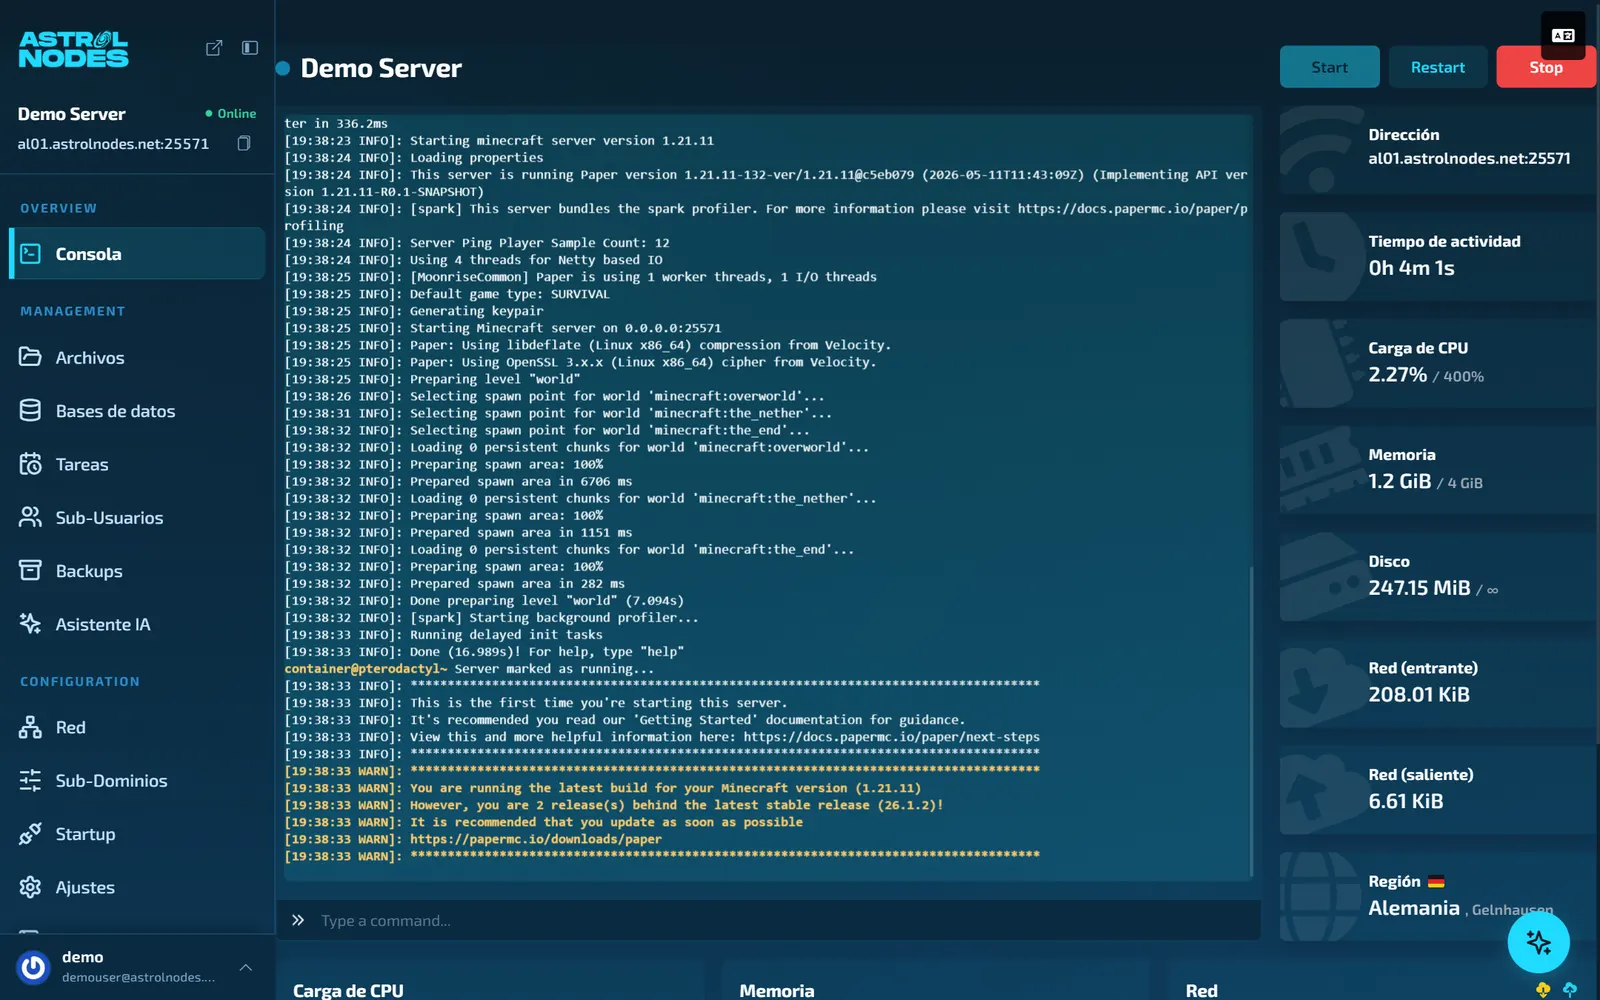
- Nada más entrar verás la Consola: el log en directo, los botones Start / Restart / Stop y el uso de CPU, memoria y disco.
- Pulsa Start. La primera vez el panel te pedirá aceptar la EULA de Minecraft — un clic en «I Accept» y sigue solo.
- Cuando la consola diga Done, tu servidor está online.
Regla de oro: si algo va raro, un Restart resuelve la mitad de los problemas.
PASO 03
Conéctate y trae a tus amigos
- La dirección de tu servidor está arriba a la izquierda del panel (con botón de copiar) y en la tarjeta «Dirección».
- En Minecraft: Multijugador → Añadir servidor → pega la dirección. Tu versión de Minecraft debe coincidir con la del servidor.
- Tus amigos solo necesitan esa misma dirección. Sin abrir puertos ni tocar el router.
Para darte permisos de administrador o cerrar el servidor a desconocidos, usa la consola:
Consola · comandos útiles
> op TuNombre — hazte administrador
> whitelist on — solo entra quien tú digas
> whitelist add NombreDeTuAmigo
Done. A jugar.
PASO 04
Cambia de versión o de tipo cuando quieras
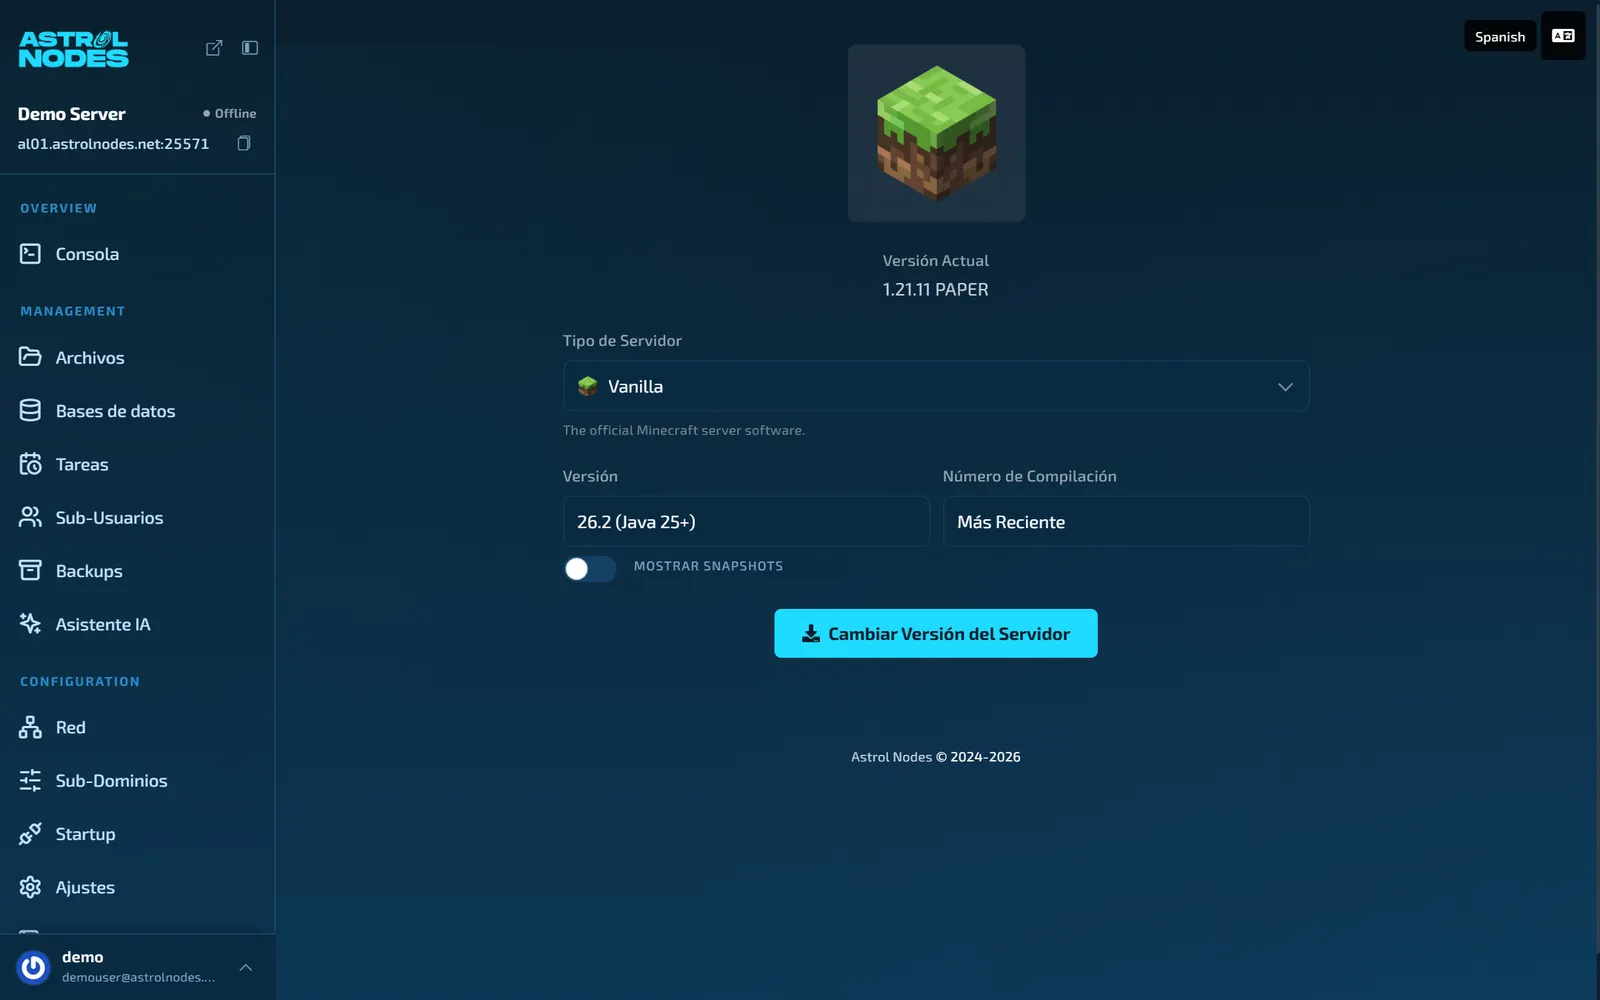
- En el menú lateral, apartado «Versión MC».
- Elige Tipo de Servidor — Paper (plugins, el recomendado para empezar), Vanilla, Forge o NeoForge (mods), Fabric… — y la versión exacta.
- Deja «Número de Compilación» en Más Reciente si no sabes cuál, pulsa «Cambiar Versión del Servidor» y reinicia. Listo, sin subir nada a mano.
PASO 05
Modpacks y mods sin complicarte
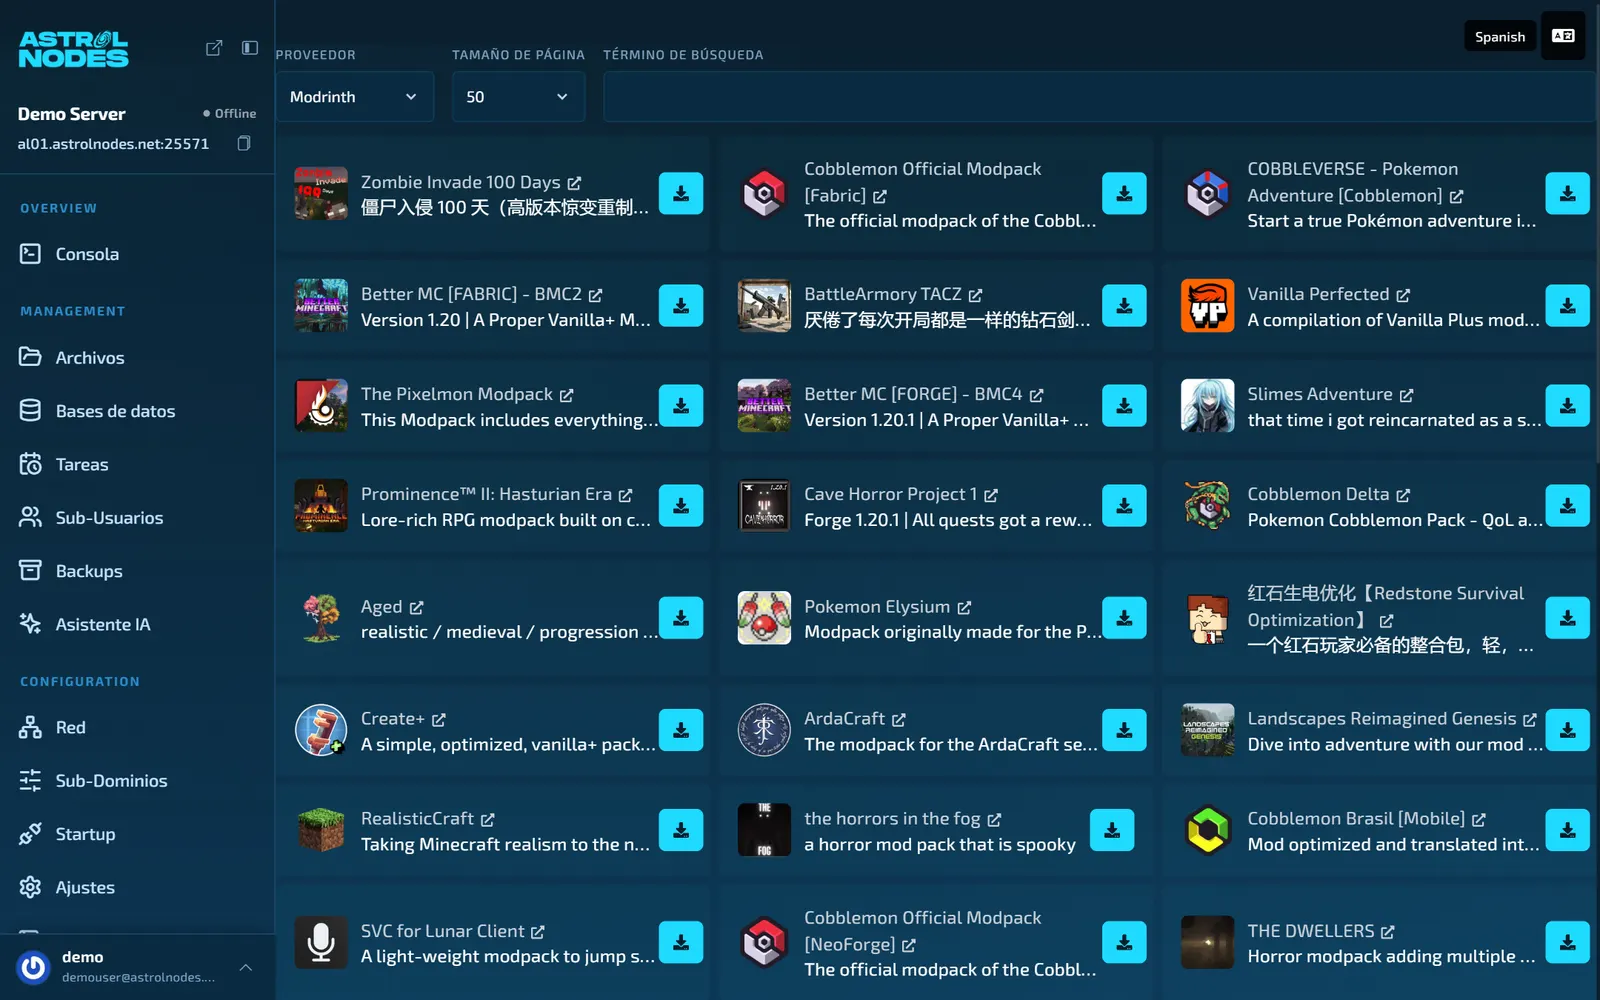
- Apartado «ModPacks»: buscador con Modrinth y CurseForge — Cobblemon, Pixelmon, Better MC, Prominence II… Un clic en instalar y el panel lo monta entero.
- ¿Mods sueltos? Apartado «Mods», o pon el servidor en Forge/NeoForge/Fabric y sube los .jar a la carpeta mods desde «Archivos».
Si un modpack no arranca, abre ticket: a veces necesita un ajuste de Java por nuestra parte y te lo dejamos fino en minutos.
PASO 06
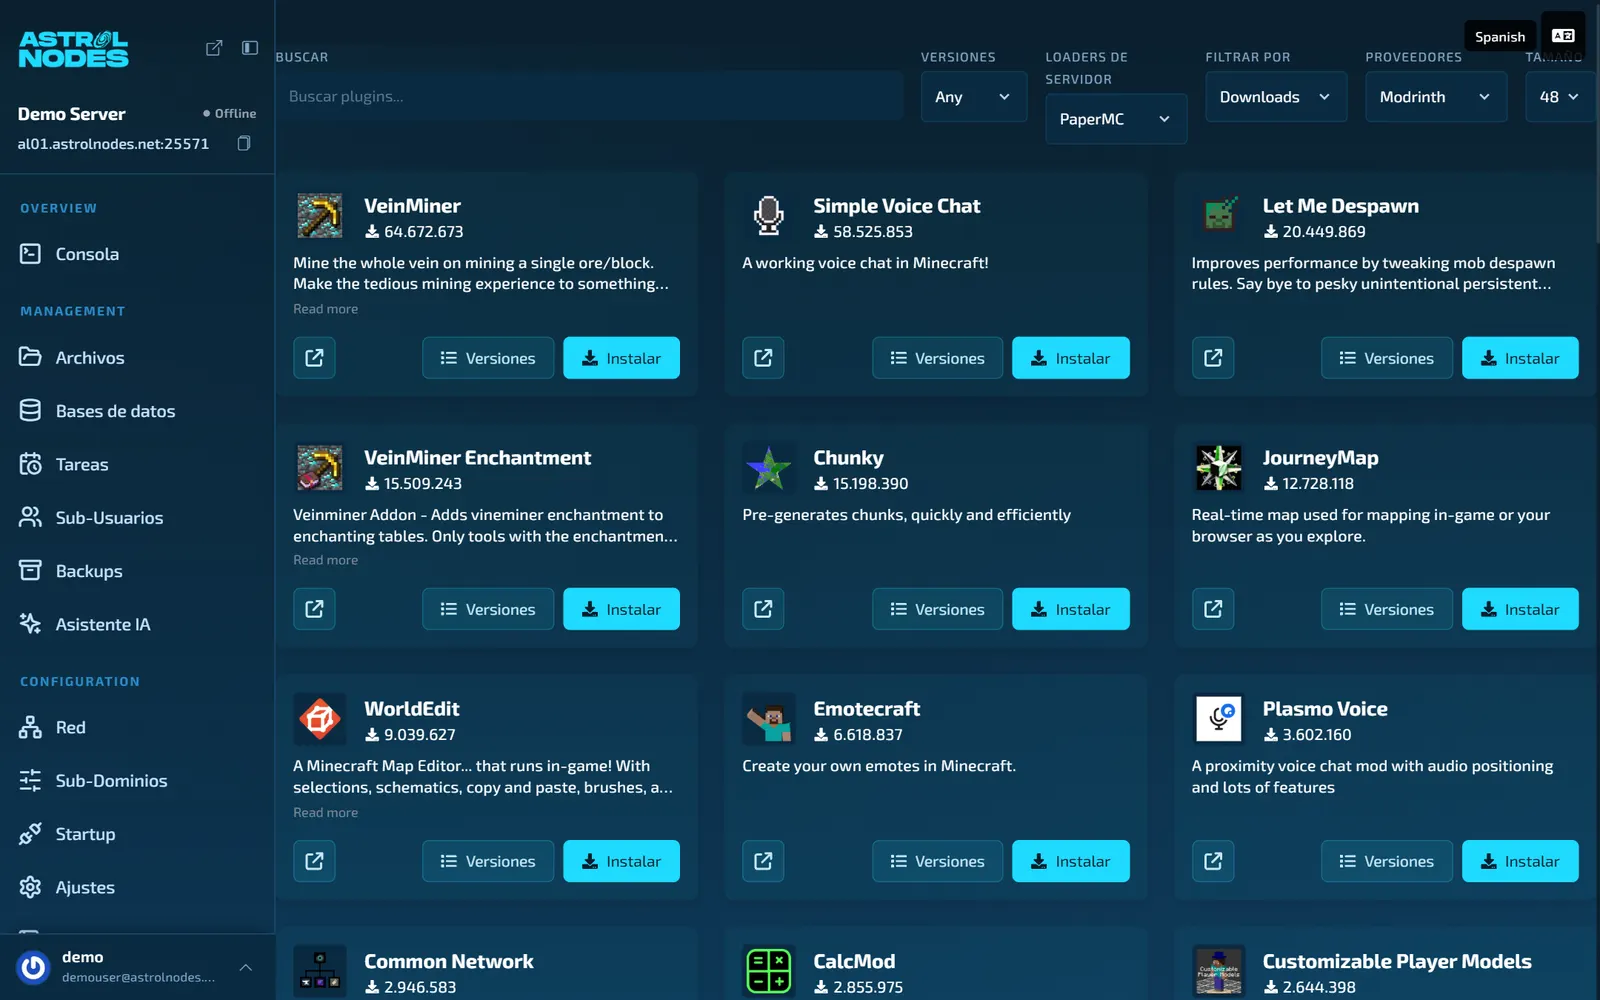
Plugins a un clic
- Apartado «Plugins» (con el servidor en Paper): buscador con filtros por versión y loader, y botón Instalar en cada uno.
- EssentialsX, LuckPerms, WorldEdit, Chunky, voice chat… funcionan tal cual.
- También puedes subir .jar a la carpeta plugins desde «Archivos» y reiniciar.
PASO 07
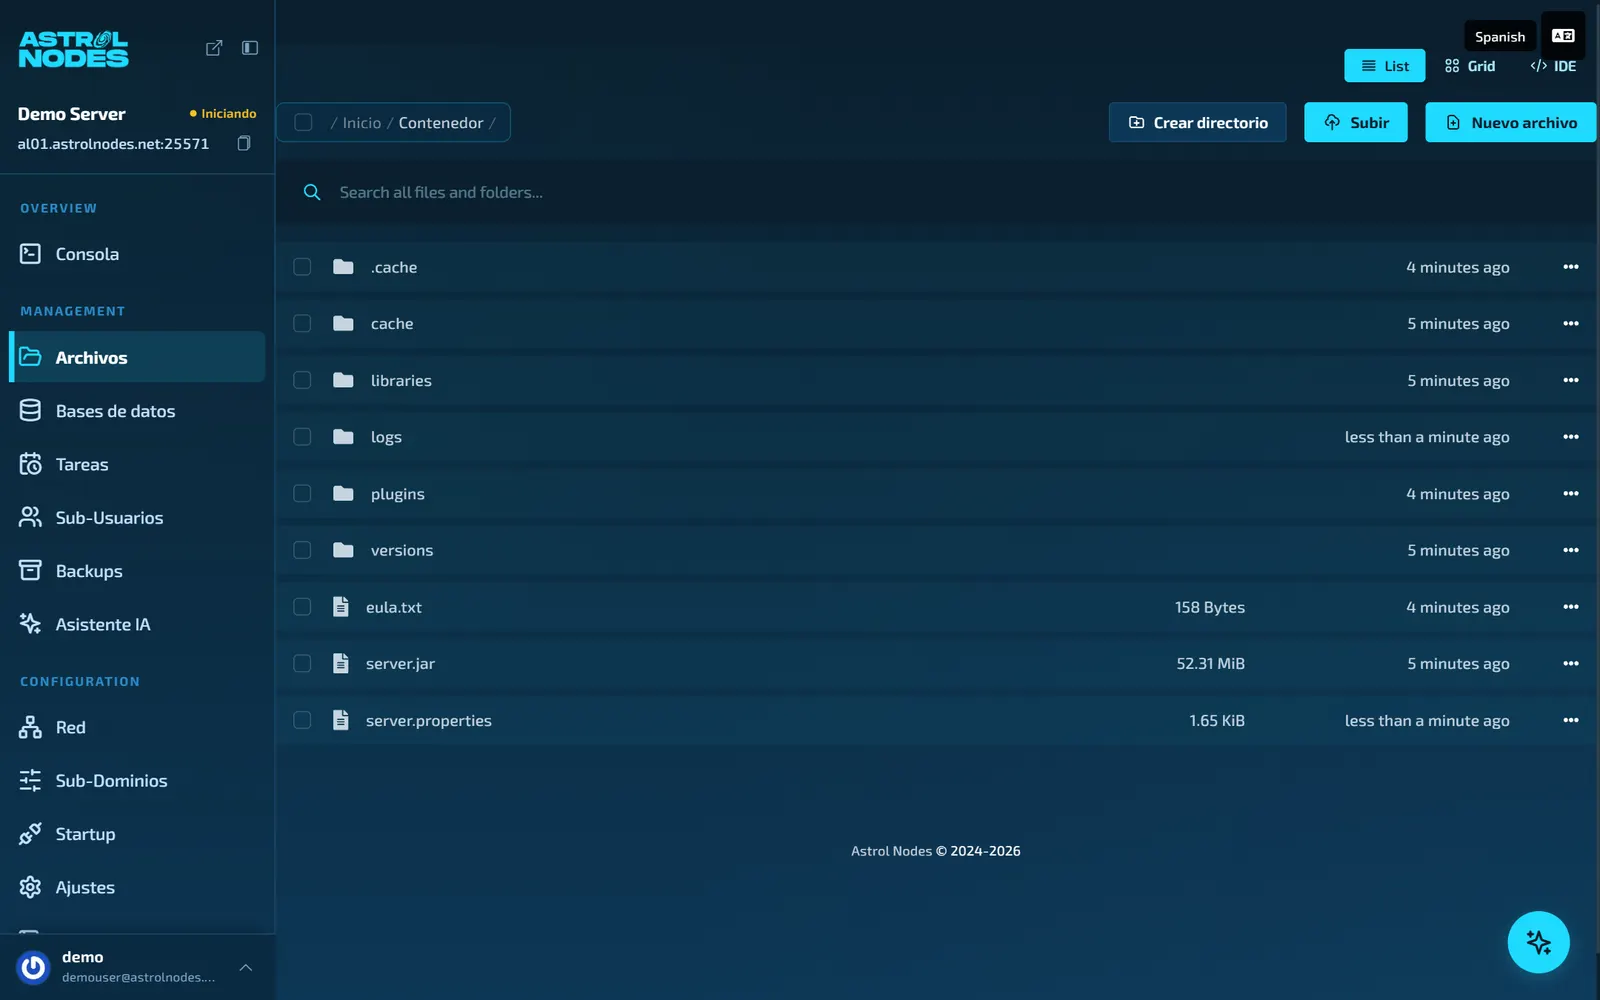
Tu mundo de siempre, en tu servidor nuevo
- En «Archivos» tienes el gestor completo: subir, editar y organizar los ficheros del servidor desde el navegador.
- Para traer tu mundo: para el servidor, sustituye la carpeta world por la tuya y arranca.
- ¿Vienes de otro hosting y te da pereza? Abre ticket con tu mundo y te lo migramos nosotros.
PASO 08
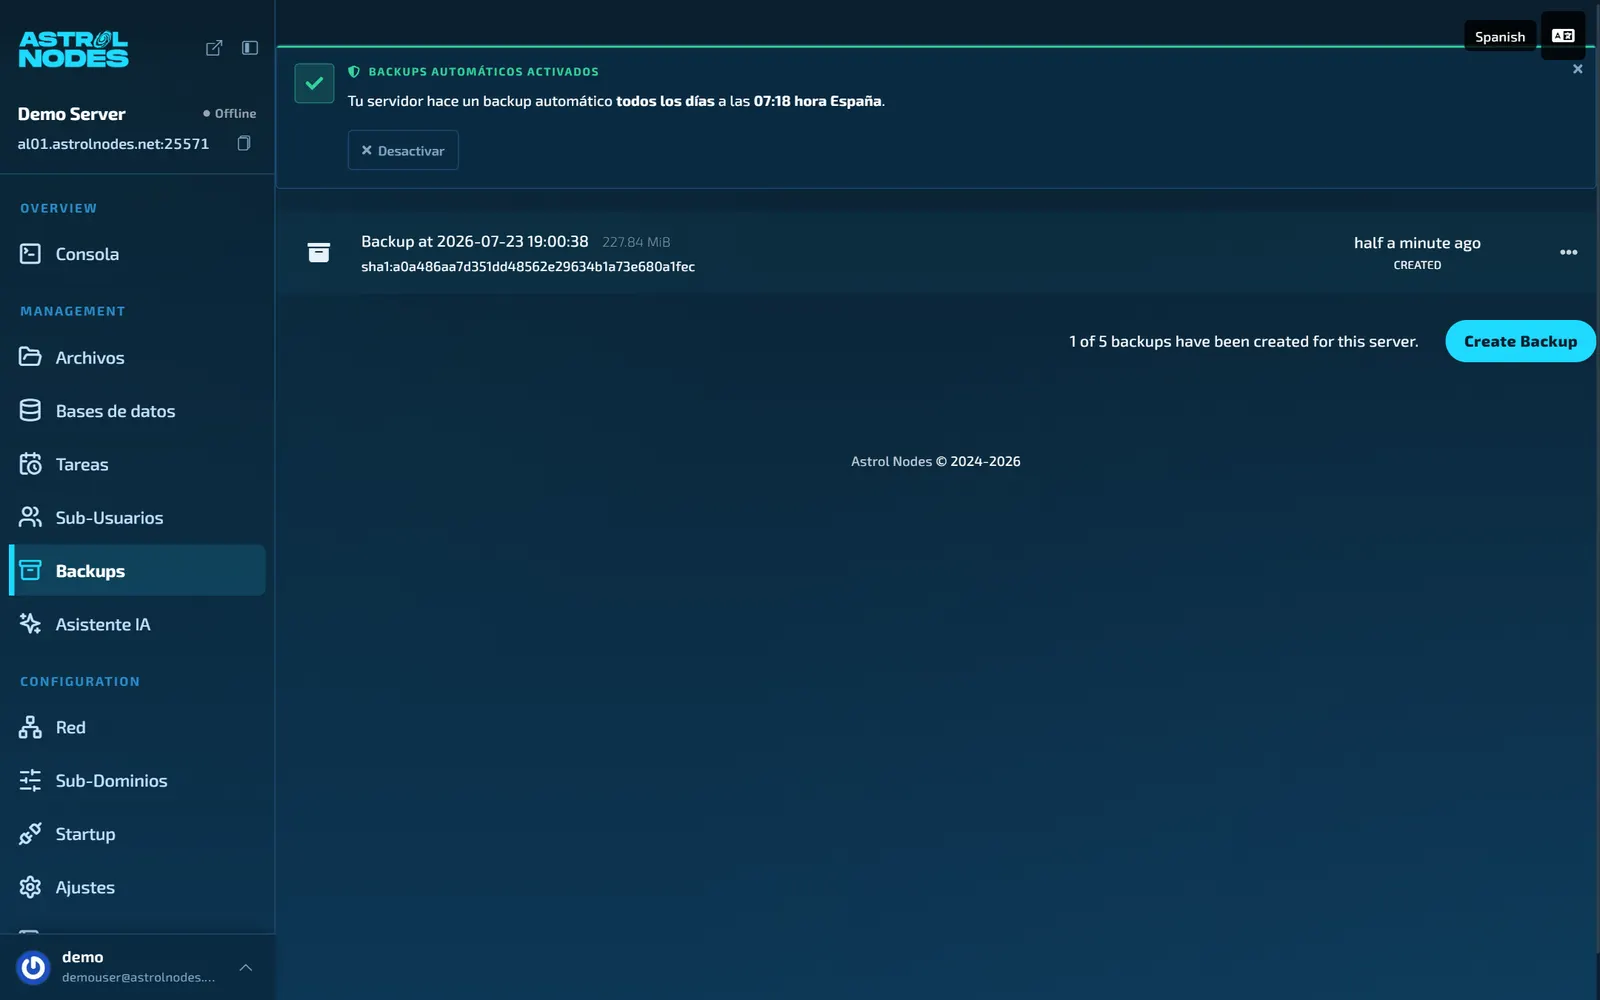
Backups: actívalos y olvídate
- En «Backups», pulsa «Activar backup automático diario» — un clic, sin reinicios. Copia completa cada día (mundo, configs, plugins) con rotación automática.
- Antes de un cambio gordo (modpack, cambio de versión), haz también una copia manual con Create Backup.
- Restaurar tarda minutos. El número de copias depende de tu plan.
PASO 09
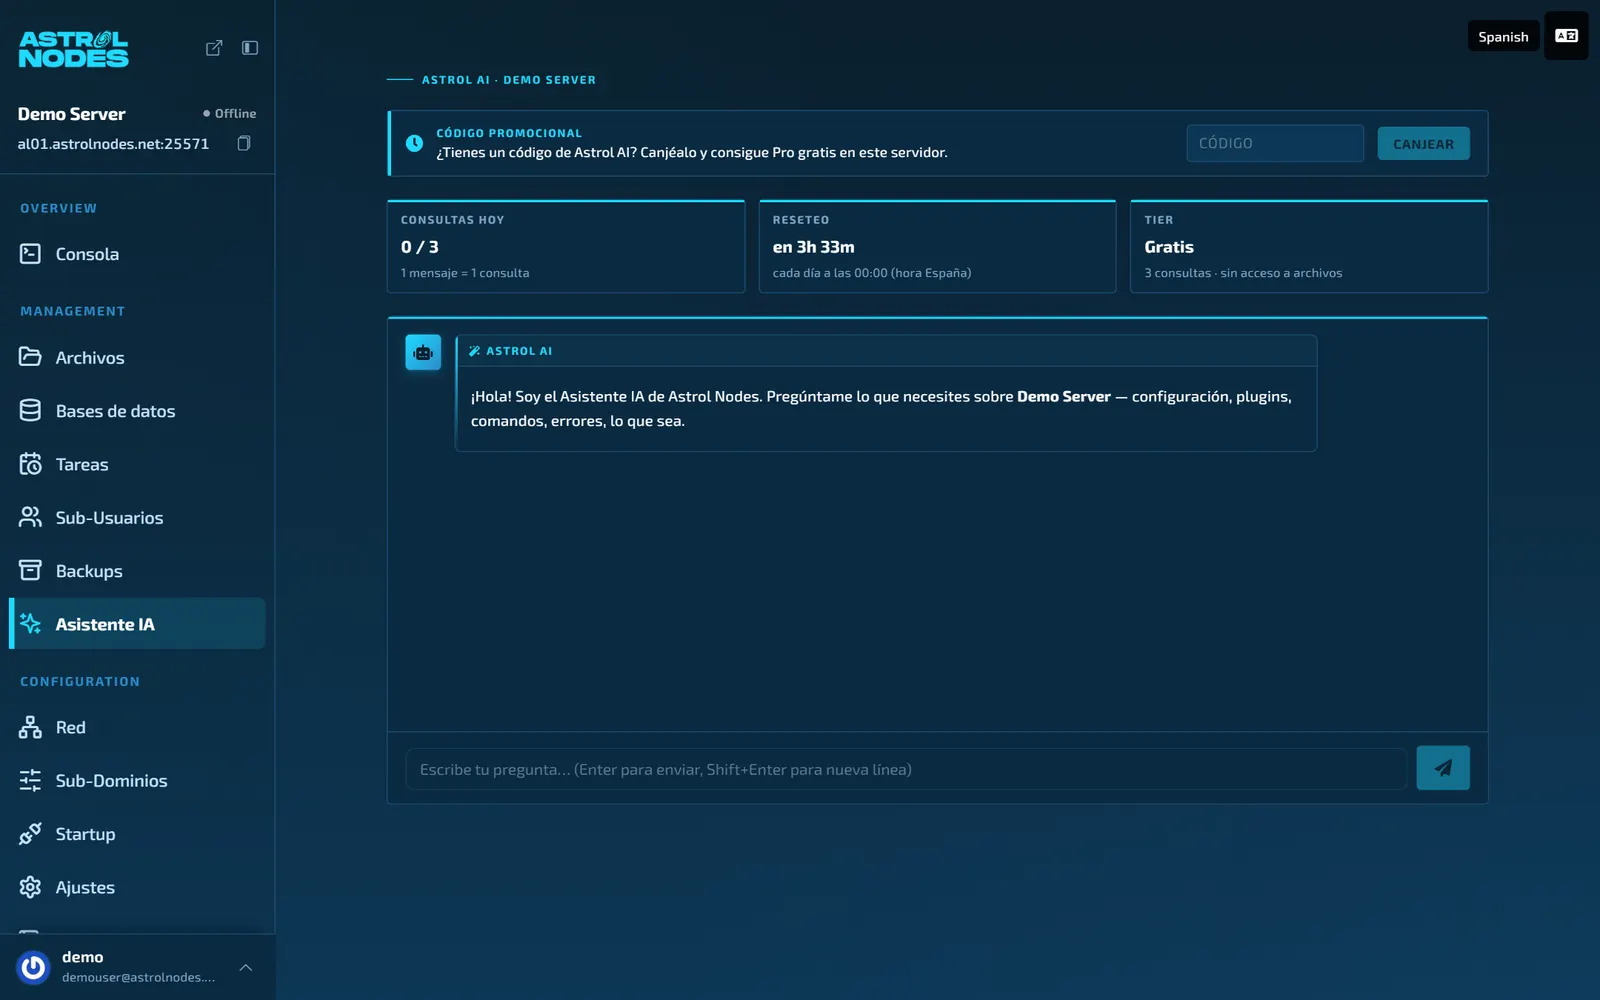
¿Dudas? Pregúntale a la IA del panel
- Apartado «Asistente IA»: escríbele en lenguaje normal — «cámbiame la versión a 1.20.1», «¿por qué no arranca?» — y diagnostica tu servidor, e incluso ejecuta acciones por ti.
- Incluido gratis con tu servidor: 3 consultas al día, se renuevan cada noche.
Y si te atascas, estamos al otro lado
No pelees una hora con algo que nosotros arreglamos en cinco minutos. Abre un ticket desde tu área de cliente — también de madrugada — o pásate por nuestro Discord.